![Google Sheets Automation Using Make.com [With Project File]](https://softtechgenics.com/wp-content/uploads/2023/08/Screenshot-2023-08-30-122156.png)
Google Sheets Automation With the Help of make.com
![Google Sheets Automation Using Make.com [With Project File]](https://softtechgenics.com/wp-content/uploads/2023/08/Screenshot-2023-08-30-122156-1024x421.png)
Introduction
Today we’ll be making Google Sheets Automation with the help of Make. Also, the automation file will be available in this article.
Automating repetitive tasks can save a lot of time and effort. Make.com (formerly Integromat) is a great tool for building automations without code. In this tutorial, we will walk through the steps to create a Make automation that watches for new rows added to a Google Sheet, transforms the data into JSON format, and then sends it to a new row in another Sheet.
What is Make?
Make is a cloud-based integration platform that enables you to connect apps, data and APIs into automated workflows called scenarios. With an easy-to-use visual interface, you can build complex workflows without writing any code.
Make offers pre-built modules for popular apps like Gmail, Google Sheets, Slack, Twitter, Zapier and more. You simply drag and drop modules into a workflow, connect them together and configure any options. Make handles all the underlying APIs and scripting.
[su_box title=”Some key features and benefits of Make:” style=”soft” box_color=”#790AC0″ radius=”10″]
- Visually build workflows without coding
- 450+ pre-built modules for apps and data
- Schedule and automate workflows
- Integrate with webhooks and Zapier monitor data and trigger workflows on events Robust error handling and workflows
Overall, Make makes it fast and easy to integrate disparate systems and automate manual processes.
[/su_box]
[su_box title=”What we’ll be building” style=”soft” box_color=”#790AC0″ radius=”10″]
In this tutorial, we’ll be creating a Make scenario that Performs Google Sheets Automation:
- Watches a Google Sheet for new rows added
- Extracts data from each new row
- Transforms the data into JSON format
- Sends the JSON to a new row in another Google Sheet
This will demonstrate how to integrate Make with Google Sheets, parse data into JSON, and output it to another destination. This pattern can be extended to build more complex automations between data sources.
[/su_box]
Let’s get started!
Step 1 – Create a new Make scenario
First, we need to create a new Make scenario. A scenario is a workflow that automates a process.
- Go to [su_button url=”https://www.make.com/en/register?pc=softechgenics” target=”blank” background=”#b05ccc” size=”5″ radius=”20″]Make.com[/su_button] and login or sign up for a free account.
- Click on ‘+ New’ in the top menu bar to create a new scenario.
- Give your scenario a name like “Sheet Sync”. The name helps identify the purpose of the workflow.
- Click ‘Create’ to initialize the scenario.
This will open up a blank workflow canvas where we can start adding modules and building out the automation.
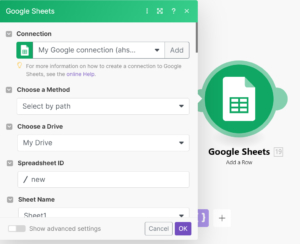
Step 2 – Add a “Watch New Row” Google Sheets module
Next, we will add a Google Sheets module that watches for new rows added to a sheet.
![Google Sheets Automation Using Make.com [With Project File]](https://softtechgenics.com/wp-content/uploads/2023/08/Screenshot-2023-08-30-123254-245x300.png)
- Click on the ‘+’ button to open the module library.
- Search for “Google Sheets” and select the “Google Sheets” service.
- This will open the list of available Google Sheets modules. Find the “Watch new row” module and click on it.
- The module will be added to the workflow. Click on it to open the configuration panel.
- You will need to connect your Google account. Click the ‘Connect account’ button and follow the prompts to connect Make to your Google account.
- After it is connected, select the Google Sheet you want to watch from the dropdown.
- For the Worksheet, select the specific sheet inside the Spreadsheet to watch.
- Leave Filter empty for now. We want to watch all rows.
The module is now configured to watch for any new rows added to the selected Google Sheet worksheet. It will trigger the workflow whenever a new row is added.
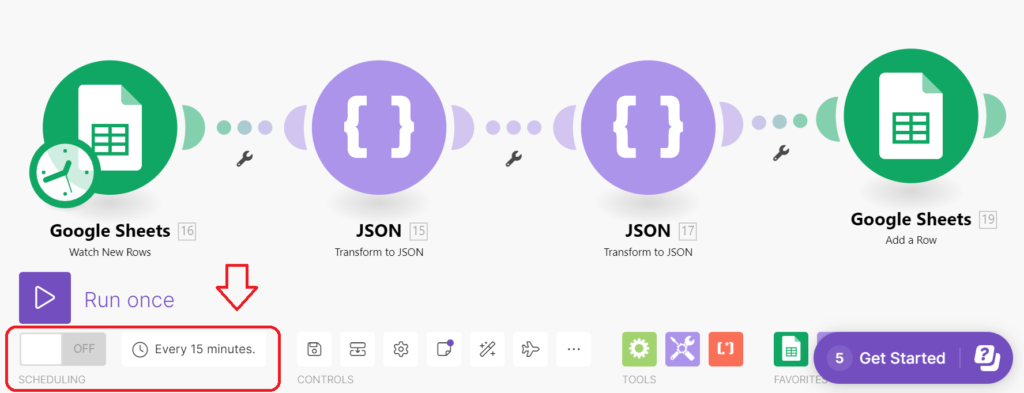
Step 3 – Add a “Transform to JSON” module
Next, we need to transform the row data into JSON format.
![Google Sheets Automation Using Make.com [With Project File]](https://softtechgenics.com/wp-content/uploads/2023/08/Screenshot-2023-08-30-123335.png)
- Click the ‘+’ button to open the modules again.
- Search for “JSON” and select the JSON service.
- Locate the “Transform to JSON” module and add it after the Google Sheets module.
- Connect the Google Sheets module to the JSON module by dragging the dot on the right of the first to the left dot of the second. This passes the row data into the JSON module.
- Click on the JSON module to open its configuration.
- In the Data section, select ‘Input data’ as the source. This takes the input from the previous module.
- Configure the Object name, Row name, and any Fields you want to include.
- Click ‘Apply changes’ to save the configuration.
Now any data received from the Google Sheets module will be transformed into a JSON object based on the configuration.
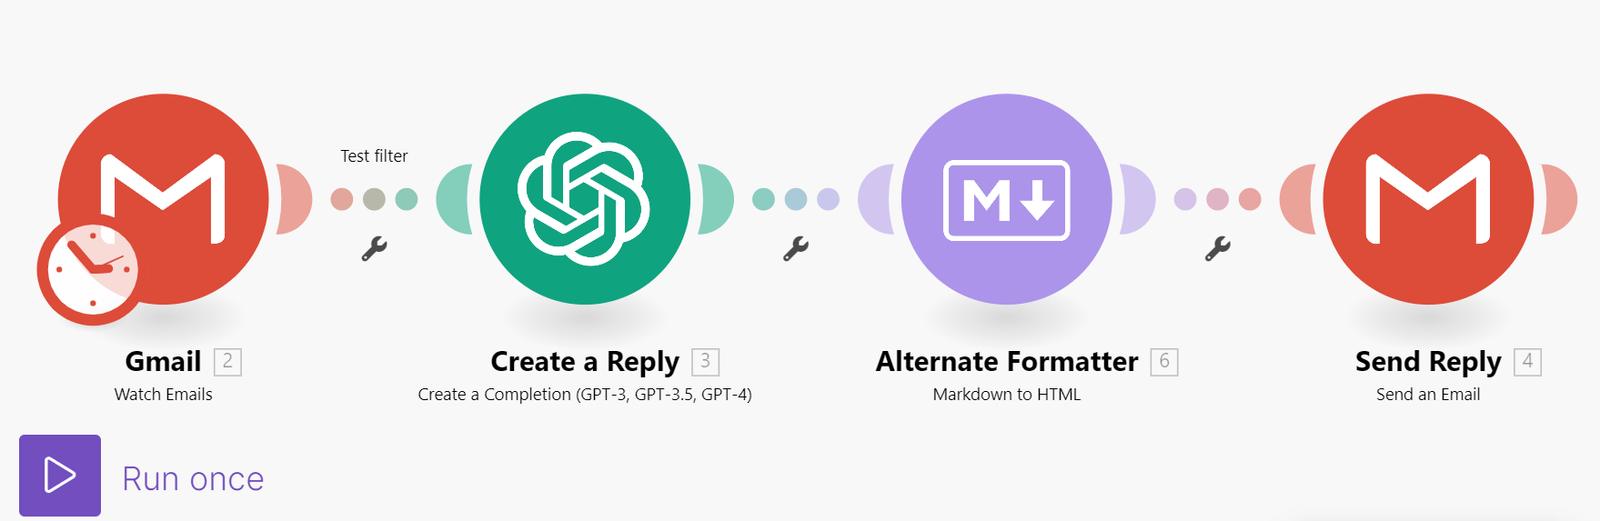
Step 4 – Add a second “Transform to JSON” module
Let’s add another JSON transformer to further reshape the data structure.
![Google Sheets Automation Using Make.com [With Project File]](https://softtechgenics.com/wp-content/uploads/2023/08/Screenshot-2023-08-30-123348.png)
- Drag in a second “Transform to JSON” module from the modules list.
- Connect the first JSON module to the new one to pass the data.
- Open the configuration and select ‘Input data’ as the source again.
- Adjust the Object name, Row name, and Fields as needed.
- Click ‘Apply changes’.
With two JSON modules, we can parse and restructure the data in multiple steps.
Step 5 – Add a “Add a row” Google Sheets module
Finally, we need to output the transformed JSON to a new row in another Sheet.
- Add the “Add a row” Google Sheets module after the JSON modules.
- Connect the last JSON module to the new Google Sheets module.
- In the configuration, select the Destination Spreadsheet and Worksheet.
- Map the JSON fields to the equivalent Sheet columns.
- Click ‘Apply changes’.
Now the JSON data will be written to the specified Sheet in a new row every time the workflow runs.
Step 6 – Test the scenario
We can now test the completed scenario.

- Open the Source Google Sheet we are watching.
- Add a new row with some sample data.
- Switch back to Make to see it detect the change and process the data.
- Check the Destination Sheet to confirm the new transformed row was added.
If everything is mapped properly, the new row should appear within a few seconds of adding data to the source Sheet!
Next steps
And that’s it! In a few simple steps we built an automation to sync data between Sheets.
Some additional things you could do:
- Add date/timestamps to track processing
- Email notifications on errors
- Enhance parsing and transform logic
- Add columns in destination with scenario metadata
- Process multiple source sheets into a combined destination
- Schedule the scenario to run on a fixed interval
- Monitor a Google Form instead of directly adding rows
[su_quote]Also, Check the Previous Article about Telegram Image Generation Bot[/su_quote]
Hopefully this gives you a solid foundation to start building your own Sheet automations with Make! Let us know if you have any other questions.

![Telegram Image Generation Bot [With Free Source File]](https://softtechgenics.com/wp-content/uploads/2023/08/Screenshot-2023-08-26-120046.png)
