Master Efficiency: Gmail Automation Simplified
Introduction
In this tutorial, we will walk through how to create an automated Gmail autoresponder bot using the intuitive automation platform Make. With this bot, you can automatically generate responses to incoming emails using the powerful GPT-3 AI model from OpenAI.
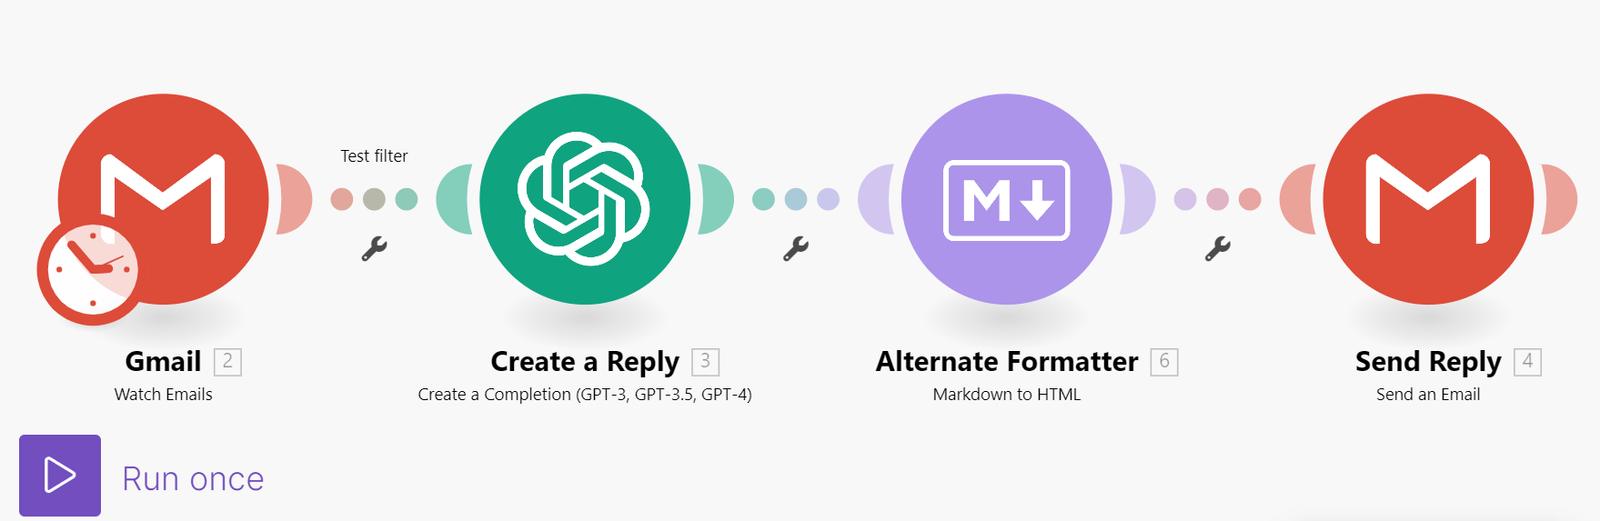
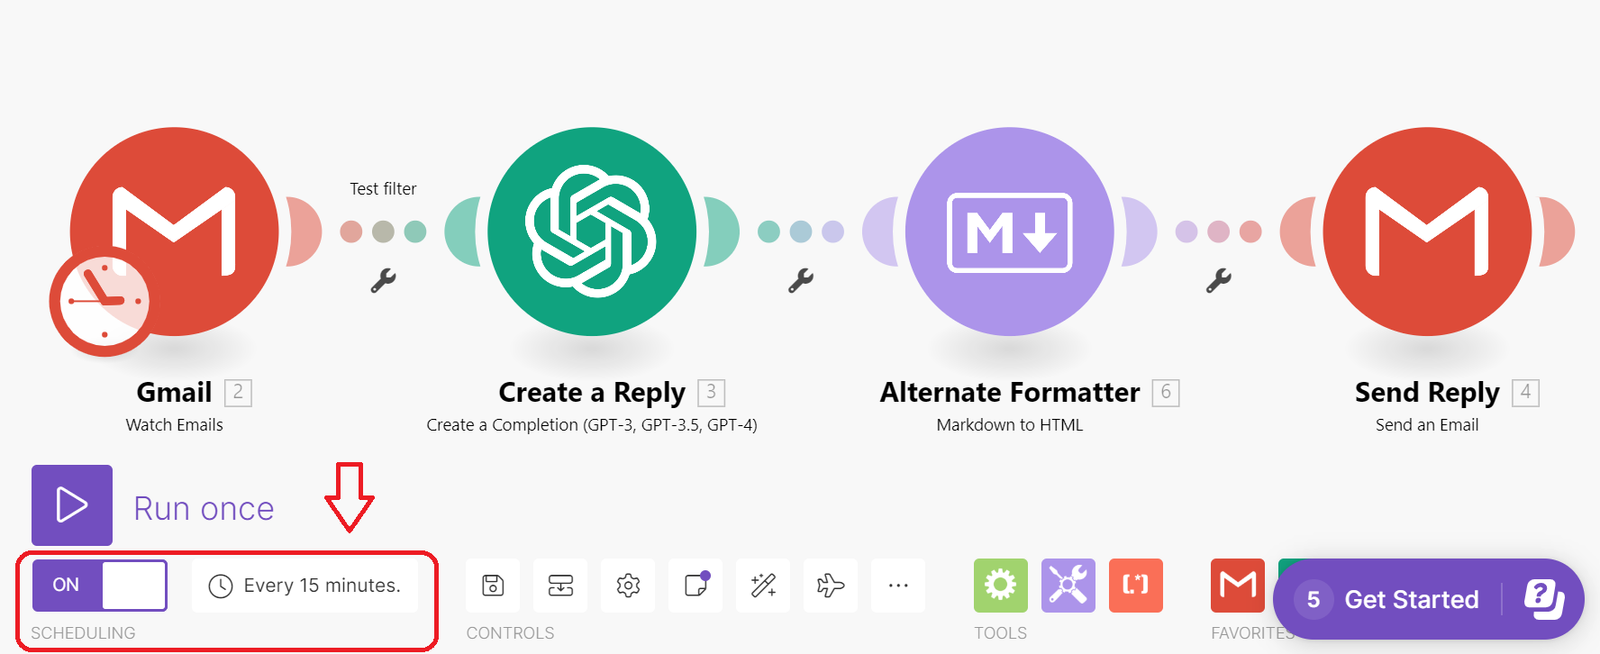
The bot works by connecting several modules together into a workflow:
- The Gmail module watches for new incoming emails and triggers the workflow when there are new messages.
- The email content is sent to the OpenAI module, which generates a response using GPT-3.
- The raw GPT-3 output is passed through a Markdown to HTML module to convert it into properly formatted HTML.
- Finally, the response email is constructed and sent back to the original sender via the Send Email module.
By chaining together these different building blocks, we can create a hands-off automated system for responding to emails without any ongoing human involvement. The GPT-3 AI will generate thoughtful, detailed responses based on the content of each incoming message.
This bot is great for handling common customer service emails, newsletters, and other scenarios where you want quick, personalized responses at scale. Read on for the step-by-step guide!
Step 1: Sign Up for Make
- First, you’ll need to sign up for a Make account at [su_button url=”https://www.make.com/en/register?pc=softechgenics” target=”blank” background=”#b05ccc” size=”5″ radius=”20″]Make.com[/su_button]. Make offers a free plan that will support our basic email bot workflow.
- Once signed in, you’ll arrive at the Make dashboard. This is where you can create and manage your automations.
Step 2: Create a New Scenario
- Make uses “scenarios” to house your workflows. Let’s create a new scenario for our email responder bot.
- Click the “Create Scenario” button and give your scenario a name like “Email Autoresponder Bot”. You can leave the workflow trigger set to “Manual” for now.
Step 3: Add the Gmail Module
- With an empty scenario created, we can start adding modules to build out the workflow.
- The first module we need is Gmail, since we want to watch for new incoming emails. To add a module, click the “+ Module” button on the canvas.
- This will open the module library. Search for “Gmail” and you should see some options pop up. We want the “Check for new emails” module.
- Click to add this module to the canvas.
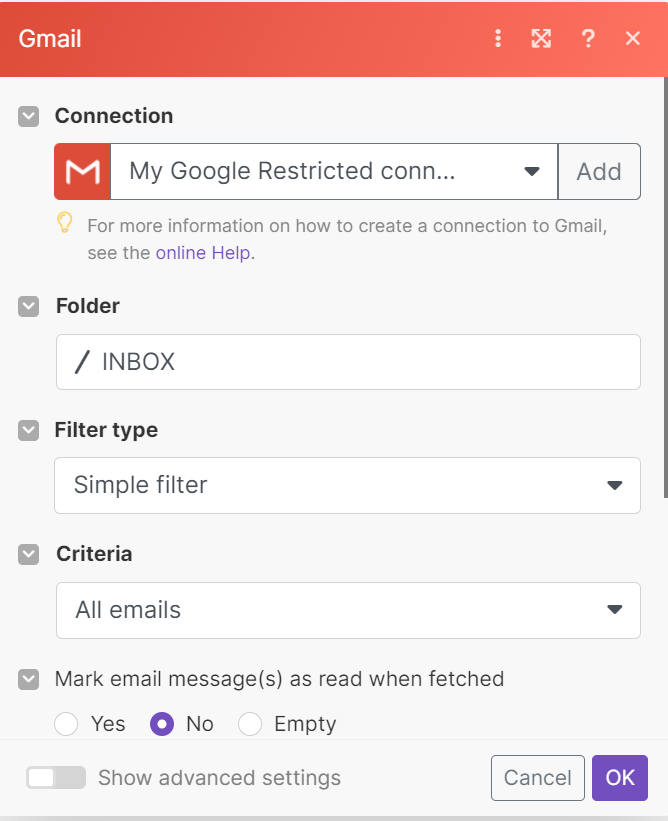
Step 4: Authenticate with Gmail
- After adding the Gmail module, a configuration panel will appear on the right side.
- Here you need to connect your Gmail account by clicking “Authenticate your account”. Follow the steps to sign in to your Gmail account and grant access.
- For our bot, we want to watch the inbox that will be receiving customer/client emails. Choose that inbox in the “From email address” dropdown.
- You can leave the filters blank to check all emails in that inbox.
Step 5: Add the OpenAI Module
Now that we’re watching for new Gmail, we need to generate responses to those emails. This is where OpenAI comes in!
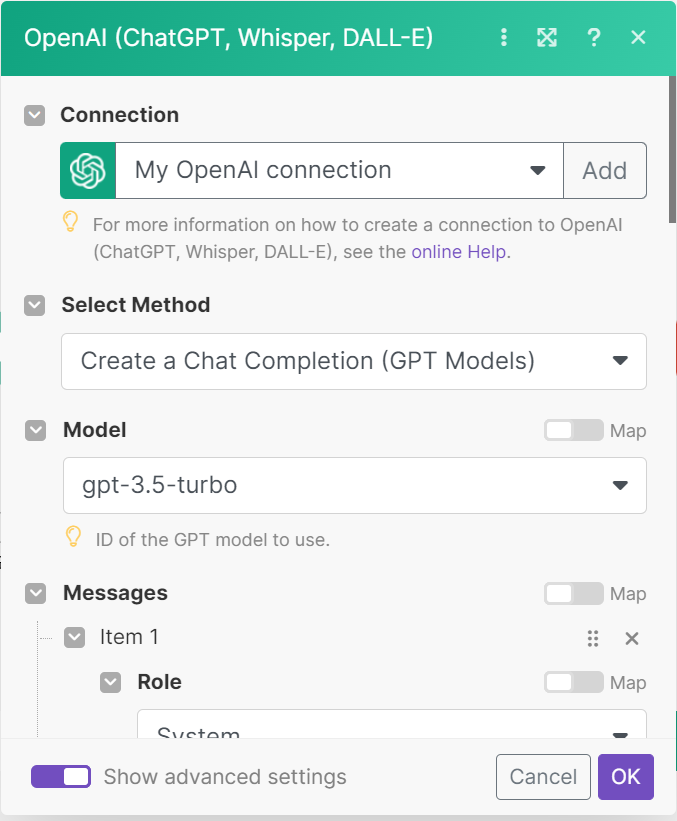
- Click “+ Module” again and search for “Open AI”. Choose the “Create completion” module.
- Just like Gmail, you’ll need to authenticate with your OpenAI API key. You can get an API key for free by signing up at [openai.com](http://openai.com).
- Paste your secret API key into the module configuration.
Step 6: Configure the OpenAI Prompt
- With OpenAI connected, we now need to configure the prompt that will generate our email response.
- The prompt is made up of two items the email context, and the response instructions.
- Under “Message 1”, set the Role to System. This will tell GPT-3 that the first message is providing context.
In the text area, put something like:
“`
You are an Email assistant created by OpenAI to be helpful, harmless, and honest. Your job is to generate thoughtful, detailed responses to customer service emails.Customer email:
“`
This gives GPT-3 background on its role.
- Under “Message 2”, set the Role to User. This message will contain the actual email content.
We can reference the email subject and body that we’re watching for with:
{{ Gmail.subject }}
{{ Gmail.plain_text_body }}
Assistant response:
- This inserts the email details as the prompt, and asks GPT-3 to generate the response.
- You can tweak the number of tokens, temperature, etc. to optimize the responses.
Step 7: Convert Response to HTML with Markdown
So far we have the plain text response from GPT-3. But we want to send an HTML email for proper formatting.
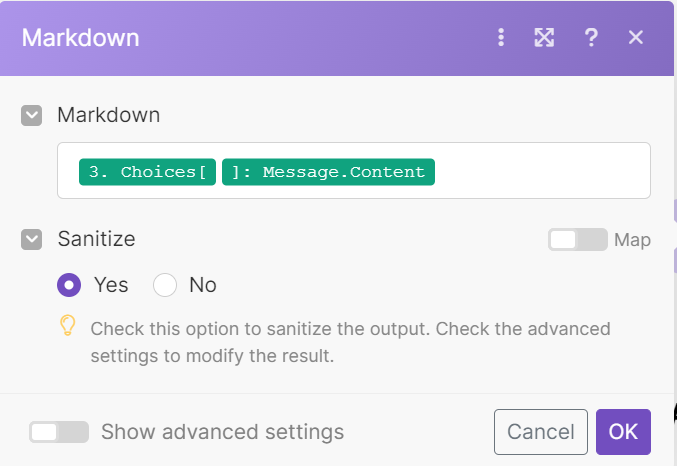
- To convert to HTML, we’ll chain the Markdown to HTML module after OpenAI.
- Add the Markdown to HTML module to the canvas, and connect it after OpenAI.
In the module settings, set the Input Type to Raw Text and the Input Text to:
{{ OpenAI.message }}
This inserts the GPT-3 response as the input to convert to HTML.
Step 8: Send the Email with Gmail
The last step is sending the response back to our customer using the Gmail Send Email module.
- Add this module and authenticate with the Gmail we want to send from.
In the module settings, set:
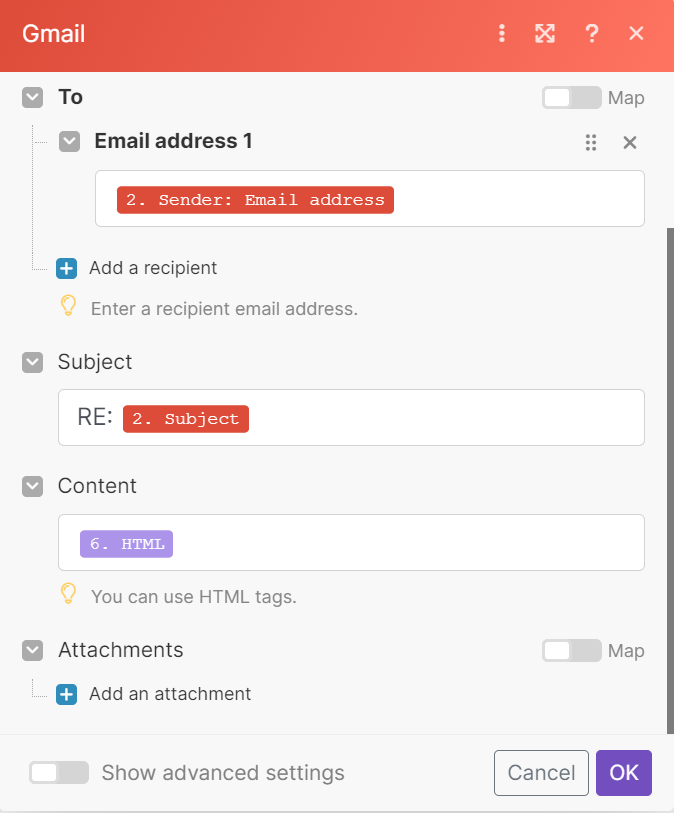
Recipient: `{{ Gmail.from_email }}` (the original sender)
Subject: `Re: {{ Gmail.subject }}`
Body: `{{ Markdown_to_HTML.html }}`
This constructs the full response email using details from the original message.
Step 9: Connect the Modules
We have all our modules, now we just need to connect them together!
Connect the modules in this order:
- Gmail > OpenAI > Markdown to HTML > Gmail Send Email
- This chains together the steps, passing the email → generating response → converting to HTML → sending email.
Step 10: Test and Refine the Bot
Our bot is ready! You can now test it by sending an email to your monitored inbox and watching it respond.
Review the GPT-3 responses and further tweak the prompt and settings if needed to get great responses tailored to your use case.
You can activate the scenario to have it run continuously. Make also supports scheduling it at specific times if you don’t need 24/7 uptime.
And that’s it! With just a few modules and connections, you now have a hands-off Gmail autoresponder bot powered by AI. You can further build on this workflow to support more complex email handling logic.
The flexibility of Make and GPT-3 makes it simple to create automated workflows like this that would normally require complex programming. Intelligent automation is the future
give it a try with this email bot starter workflow!
Detailed Step-by-Step Instructions
Now let’s go through each step outlined above in more detail. We’ll look at every click needed to set up this automation from start to finish.
Step 1: Sign Up for Make
- Go to [su_button url=”https://www.make.com/en/register?pc=softechgenics” target=”blank” background=”#b05ccc” size=”5″ radius=”20″]Make.com[/su_button]
- Click “Get Started” in the top right corner
- Enter your email address and choose a password
- Click “Create Account”
- Check your email to confirm your account
- In the email, click the account confirmation link
- You will be redirected back to make.com, now logged into your new account!
Step 2: Create a New Scenario
- After logging in, you will be on the Make dashboard
- Click the large “+” button in the top right corner
- Select “New Scenario” from the dropdown menu that appears
- In the popup, name your scenario “Email Autoresponder Bot”
- Leave the trigger set to “Manual”
- Click “Create Scenario”
Step 3: Add the Gmail Module
- In your new scenario, click the “+ Module” button
- This opens the module library
- search for “Gmail”
- Hover over the “Check for new emails” module
- Click the “+” icon to add it
- The module will be added to the canvas
Step 4: Authenticate with Gmail
- In the right panel, select the Gmail module
- Under Authentication, click “Authenticate your account”
- This will open a popup
- click the Google account you want to connect
- Sign in with your Google account credentials if prompted
- Accept the permissions request to allow Make access
- You will be redirected back to Make
- Gmail is now connected!
- Under From Email Address, select the inbox you want to monitor
Step 5: Add the OpenAI Module
- Click the “+ Module” button again
- Search for “OpenAI”
- Hover over “Create completion” and click the “+” to add
- The OpenAI module will be added to the canvas
Step 6: Configure the OpenAI Prompt
- Select the OpenAI module in the right panel
- Under Authentication, paste in your OpenAI API key
- Leave the model as the default GPT-3.5 Turbo
- Under Message 1, change Role to System
- Add context about the AI assistant as shown earlier
- Under Message 2, change Role to User
- Add the email variable prompts as shown earlier
- Tweak temperature, tokens, etc. if desired
Step 7: Convert Response to HTML
- Click “+ Module” and search “Markdown”
- Hover over “Markdown to HTML” and click the “+” to add
- Connect this module after the OpenAI module
- Set the Input Type to Raw Text
- Set the Input Text to `{{ OpenAI.message }}`
Step 8: Send the Email
- Add the Gmail “Send an email” module
- Authenticate with the desired sending Gmail
- Set Recipient to `{{ Gmail.from_email }}`
- Set Subject to `Re: {{ Gmail.subject }}`
- Set Body to `{{ Markdown_to_HTML.html }}`
Step 9: Connect the Modules
- Connect Gmail → OpenAI → Markdown to HTML → Send Email
- Click and drag the dot on the right of one module
- Connect it to the dot on the left of the next module
- Do this to link all modules together in sequence
Step 10: Test and Refine
- Send a test email to your monitored Gmail inbox
- See if you get an automated response
- Check the response quality and tweak the OpenAI prompts if needed
- Activate your scenario from the top right to run continuously
- Or schedule it if you only want responses during certain hours
And that covers it! By following these steps, you now have a fully automated AI email responder bot set up with Make. Let me know if any part needs further explanation or if you have any other questions!

![Telegram Image Generation Bot [With Free Source File]](https://softtechgenics.com/wp-content/uploads/2023/08/Screenshot-2023-08-26-120046.png)
![Google Sheets Automation Using Make.com [With Project File]](https://softtechgenics.com/wp-content/uploads/2023/08/Screenshot-2023-08-30-122156.png)
